Address generation
Single address
By default, LiftTokens use the single address set in Settings > Cryptocurrency addresses for all transactions in the same cryptocurrency. More details below.
- LiftTokens detect the payment from its cryptocurrency amount, in which case, the amount is always unique for each transaction.
- The amount always changes less than 0.02% of the original amount.
- The user must submit the exact amount shown by LiftTokens or the payment will not be detected.
- The underpayments setting is not compatible with the single address method. You have to activate the address generation to use this setting.
- An address can be used again 24 hours after the last outstanding transaction or immediately after completing the transaction or if a transaction has been canceled. Your can stop the reusing addresses after 24 hours by checking Settings > Stop reusing addresses.
Address generation
When using this feature LiftTokens generates a new and unique cryptocurrency address for each transaction.
- You can activate address generation via address list, nodes, Gemini, Coinbase, custom explorer.
- The transaction amount for the same FIAT amout remains the same.
-
If the user sends an amount different from the one show by LiftTokens(partial payment) the transaction is still recognized but is completed only if the amount is equal or more than the requested amount.
If the amount is less than the requested amount, and the underpayments setting is not active, the following happen:
- The transaction status is set to Underpayment.
- The amount sent and what remains to be sent are saved in the description of the transaction, view it from the Transactions area. Open the transaction menu to view the full description.
- The user sees a message showing that there is an underpayment. You can customize the message from Settings > Payment form texts.
- The webhook is not sent.
- The TransactionCompleted JS event is not sent.
- In case of WooCommerce, or with other integrations, the purchase is not completed.
-
You can activate multiple address generation methods and use them as backup methods if one method fails.
The priority is as follow:
- 1. Nodes - Address generation via node has priority and if active is always used first.
- 2. Custom explorer
- 3. Address list
- 4. Coinbase and Gemini - They are used only as last option.
- 5. Single address
- The number of decimals is limited to 2 if the cryptocurrency of the transaction is a stablecoin.
- You must add the addresses in Settings > Cryptocurrency addresses also if you use address generation.
Address list
This method generates the address using a list of addresses manually set by you.
- You have to add at least 3 addresses to activate the address generation.
- Add the addresses in Settings > Cryptocurrency addresses, separate addresses by comma.
- The first address is reserved and used only if no more addresses are available, in this case the single address method is used.
- If you use the whitelist function, you need to add all the addresses in the whitelist.
- The LiftTokens balance section controls only the first address.
Underpayments
Activate the Settings > Accept transactions with underpayments option to start accepting underpayments. An underpayment occurs when the user sends an amount that is less than what LiftTokens requested.
- Only underpayments with a difference of 5% or less are accepted. If the user sends an amount that is less than 5% of the requested amount, the transaction will not be accepted.
- Underpayments only works if the address generation is active.
Webhook
Webhooks are automated data sent from LiftTokens to a URL set by you when something happens. Use the webhook to validate and finalize the purchase. For security reasons you should always validate the purchase via webhook. You must be a developer and know how to coding to setup the webhook.
How to validate a purchase
-
In Settings > Webhook > Webhook URL enter the destination URL. LiftTokens will send the data to this URL.
The URL must point to a file that read the data received, with PHP, you can use the code below to read the data.
$response = json_decode(file_get_contents('php://input'), true); - In Settings > Webhook > Webhook secret key enter a secret password of your choice. The password will be included in all webhook calls (see key value in the example below). Use it to verify that the webhook is sent by LiftTokens and not someone else.
-
Save the changes. LiftTokens will now start sending the below data when a payment is complete.
To validate the transaction you must check that the value of the key status is equal to C.
If the transaction was made from a dynamic checkout, you must also verify that the transaction amount_fiat value is correct and eqaual to the price amount of the purchased item.
{
    "key": "123456789",
    "transaction": {
        "id": "231",
        "title": "My checkout title",
        "description": "My checkout description",
        "from": "0xeb2629a2734e272bcc07bda959863f316f4bd4cf",
        "to": "0xcc1486157C47c4B76fe097fDD48c3CEDB20d01B6",
        "hash": "0x3c437c3245999087d8e0276e73f9411f0e593ccd5ed1feacb032724a8980a606",
        "amount": "0.001",
        "amount_fiat": "0.1",
        "cryptocurrency": "eth",
        "currency": "eur",
        "external_reference": "",
        "creation_time": "2022-04-14 10:00:00",
        "status": "C",
        "webhook": "1"
        "vat": {"amount":"0.33","percentage":"22","country":"Italy","country_code":"IT"}
    }
}
Information
- The webhook sent when a payment is confirmed is only ever sent 1 time.
Dynamic checkouts
To create checkouts by HTML code place the code below into the web page where you want to show the checkout.
<div data-lft="custom-123" data-price=""></div>
URL
You can create a checkout page on the fly via the URL below. Replace [your-site] with your website URL. If you changed the directory name, replace lifttokens with the new directory name. For added security you can encrypt the parameter external_reference with the PHP API function lft_encryption(). Use the URL paremeter lang=LANGUAGE_CODE to change language. If you are using the Cloud, SaaS, or Reseller version, the URL of document.location must also include &cloud=API-KEY. Replace API-KEY with the value at LiftTokens > Account > API key.
https://[your-site]/lifttokens/pay.php?checkout_id=custom-123&price=0&external_reference=ABC
WordPress shortcode
If you are using the WordPress version you can also use the following shortcode.
[lifttokens id="custom-123" price="" description="" type="inline"]
Attributes
If you are using the WordPress shortcode or the URL method remove the prefix data- from all attributes.
| Attribute | Description |
|---|---|
data-lft |
The checkout ID. It must starts with custom-. |
data-price |
The price amount. |
data-external-reference |
Enter the string you want, it will be sent via webhook and as a redirect URL parameter. |
data-redirect |
Redirect the user to a specific URL after the purchase is complete. |
data-currency |
The checkout currency. Default: Settings > Currency. |
data-type |
Set the checkout type. Available options: inline, link, popup, hidden Default: inline. |
data-note |
Add a note to the transaction. If the checkout is via URL this attribute should be URL encoded. |
data-pay |
Force the user to pay with a specific cryptocurrency. Available options: the cryptocurrency code, e.g. btc. |
Warning Security measure
When using dynamic checkouts without encrypting attributes you must validate the payment via webhook and verify that the transaction amount_fiat value is correct and eqaual to the price amount of the purchased item.
Languages
Add custom translations
You can add custom translations to translate the strings of Settings > Payment form texts.
- Include a file named translations.json into the LiftTokens root directory. Download example here.
-
The content of the file is a JSON array like the one below. Replace LANGUAGE-CODE with the two-letters language code you would like to use.
Get the language codes list here.
Replace English string with the strings entered in Settings > Payment form texts, the strings must be in English and exactly the same.
Replace Translation with the string translation.
                                       {
                                          "LANGUAGE-CODE": {
                                            "English string": "Translation",
                                            "English string": "Translation",
                                            ...
                                          },
                                          ...
                                        }
Manually set the checkout language
You can force the checkout language via URL paramenter and JS variable. To set the language via URL parameter append the attribute ?lang=LANGUAGE-CODE to the client.js script link, e.g. <script id="lifttokens" src="[YOUR-URL]/js/client.js?lang=it"></script>. To set the language via JS variable insert the JS code <script>var LFT_LANGUAGE = "LANGUAGE-CODE";</script> into the checkout page, before the client.js script. Also, Settings > Languages > Payment form language must be set to Default.
Information
- Both admin-side and client-side are multilingual. You can set the languages from Settings > Languages.
- If the language is set to multilingual the language will be the browser language of the user.
- To check the checkout language you must be logged out. If you are logged in as an administrator, log out or open the payment page from another browser or use the browser's private / incognito window.
- If you are using the WordPress version and your website is multilingual, LiftTokens will use the active page language if Settings > Languages > Payment form language is set to Default. If you are using WooCommerce or Easy Digital Downloads, you need WPML or Polylang to redirect the user to the payment page in the correct language.
Custom tokens
You can add unlimited ERC-20 and BEP-20 tokens and start accepting payments with them.
Unlisted token
If your token is not listed on major cryptocurrency exchanges, LiftTokens cannot get your token's FIAT exchange rate. To solve this issue set the USD exchange rate of your token(set how much is the USD value of 1 token) in Settings > Custom token > USD exchange rate. To retrieve the exchange rate dynamically, input the URL in the Settings section under Custom token. The URL should directly provide the USD exchange rate when accessed using the HTTP GET method. For instance, refer to this example: https://lifttokens.com/docs/files/exchange_rate.txt.
Listed token
If your token is listed on major cryptocurrency exchanges, enter all the required information in Settings > Custom token and you are done.
Information
- The setting Token code must contain the code of your token, it must be lowercase and without spaces or symbols, e.g. btc, eth.
Nodes
Connect LiftTokens to a node to enable powerful features such as address generation or transfer in a completely decentralized way, without using any third-party services. The cloud version doesn't support the following features because we don't manage the wallet keys for you, please use the PHP or WP version if you want to use those features: transfer to address, instant conversion.
Setup
- In Node URL enter the URL of your node. The URL should contain the authentication details, e.g. http://user:pass@127.0.0.1:1832.
- In Node headers enter any additional headers required for authentication. Use the following syntax: key:value,key:value,....
- See the nodes as a service section for a list of ready-to-use node providers.
Address generation
This feature generate a new and unique cryptocurrency address for each transaction.
- Once the payment is received, it is transferred to the node transfer address, if set, otherwise to the corrispong address set in Settings > Cryptocurrency addresses. The amount will be less than the received amount because of the network fee spent for the transfer.
- Generated addresses are reused 24 hours after the last payment. We do this for performance reasons and to save you money when using Ethereum.
- For more details see the address generation section.
- Warning If the transfer fails, you can retrieve the private key of the wallet containing the funds using either the PHP API function lft_encryption() or the REST API function encryption. To decrypt, use the value stored in the database row btc-addresses or eth-addresses in the lft_settings table. Decryption will reveal the addresses and their corresponding private keys.
- Warning Changing your LiftTokens login details could result in loss of funds, if there are locked funds in the generated addresses. More details here.
Address generation via Xpub - Bitcoin only
Address generation via Xpub is another way to generate Bitcoin addresses. It's more secure and generates fewer fees, but it's more complex to use.
- To enable the address generation simply enter the xpub key.
- The default address generation method supports alzo zpub and ypub keys. Address generation via node only supports xpub keys. If you only get the zpub key, convert it to an xpub key with a tool like https://github.com/jlopp/xpub-converter (download it and open the file index.html).
- Node address generation uses your node and the Bitcoin REST API to generate the address. Use it if your wallet doesn't support the address generated via the default method.
- You can get the xpub key from your wallet settings. All major non-custodial wallets like Electrum and Exodus can show it. It is recommended to use Electrum. Get the key from Wallet > Information.
- It's more secure because LiftTokens doesn't need any private keys to generate the addresses and only your wallet can access the funds sent to the generated addresses.
- Generate fewer fees because there is no need to transfer the amount from the generated address to your main address.
- If the Settings > Bitcoin Node > Transfer to address option is active, address generation via xpub is automatically disabled. LiftTokens does this because it doesn't have access to funds.
- Warning Not all wallets support the address generated via xpub by LiftTokens. Test with a small amount and see if your wallet shows the amount. If it doesn't show, your money can be recovered with your private keys but we don't provide any help for that. The support does not cover it. The Electrum wallet is compatible with LiftTokens addresses generated via xpub.
- Warning Because as xpub works, your wallet may stop checking addresses after 20 consecutive addresses with no balance. When testing, make sure you don't generate more than 20 addresses without sending any money to any of them.
Transfer to address
This feature automatically transfers the amount of cryptocurrency sent by the user to the dynamically generated address to an address set by you.
- If node address generation is enabled, LiftTokens will automatically manage and use the private keys of the generated addresses to perform the transfer.
-
If node address generation is not enabled, you need to enter the wallet private key in Settings > Wallets.
The private key must be that of the wallet of the address set in Settings > Cryptocurrency addresses.
Warning We strongly recommend using a wallet with low or no balance to avoid risking losing all your money! Don't use your main wallet. Use a new dedicated wallet, just for LiftTokens. - LiftTokens will attempt to make the transfer even if the address balance is not sufficient to cover the network fee. In that case the amount sent will be balance - fee cost and the balance of the address after the transfer will be zero or near zero in the case of Ethereum.
Transfer to address - Ethereum only
- If the payment received is not in ETH but in another token such as USDT or USDC, LiftTokens will send a small amount of ETH to the newly generated address to cover the network fee of the transfer.
- Since it is currently not possible to accurately estimate the network fee, a small amount of funds will be locked in the newly generated addresses. LiftTokens minimizes the locked amount by reusing the generated addresses every 24 hours.
- Warning Token transfer is currently expensive and could significantly reduce your earnings if the amount transferred is small.
Instant conversion - Ethereum only
This feature automatically converts the user-submitted cryptocurrency amount into another cryptocurrency such as USDT or USDC each time a transaction is completed.
-
To enable this feature you must enter the private key of your wallet in Settings > Wallets.
The private key must be the one of the wallet of the address set in Settings > Cryptocurrency addresses.
Warning We strongly advise using a wallet with low or zero balance to avoid risking losing all your money! Do not use your main wallet. Use a new, dedicated wallet, only for LiftTokens. - This feature is powered by Uniswap.
- If this function is active, the transfer function is disabled.
- Only ETH and ETH ERC-20 tokens are supported.
- Warning Token conversion is currently very expensive and may significantly reduce your earnings.
Refunds
More details about the refunds feature here.
Nodes as a service
Running your own node can be challenging. There are a number of services that run optimized node infrastructures for you, so you can focus on developing your application or product instead. The list below contains node providers that we have already tested with LiftTokens.
| Service | Setup |
|---|---|
| nownodes.io |
|
| alchemy.com |
|
| chainstack.com |
|
Lightning Network
Connect LiftTokens to a Lightning Network node to start accepting Bitcoin payments on the Lightning Network.
Setup
- In Node URL enter the URL of your Lightning Network node.
- In Macaroon enter your admin Macaroon in hex format.
- In Node headers enter any additional headers required for authentication. Use the following syntax: key:value,key:value,....
- See the nodes as a service section for a list of ready-to-use node providers.
Information
- Only LND nodes are supported. Details here.
- If the invoice generation fails (for example because there is not enough remote balance), the LiftTokens checkout goes back to the cryptocurrency list, informs the user of a problem and asks to use another cryptocurrency.
- Enable Settings > Email notifications > Lightning Network error to get notified by email when invoice generation fails.
- You can use Boltz to get remote balance.
Nodes as a service
Running your own Lightning Network node can be challenging. There are a number of services that run optimized node infrastructures for you, so you can focus on developing your application or product instead. The list below contains node providers that we have already tested with LiftTokens.
| Service | Setup |
|---|---|
| voltage.cloud |
|
PayPal
Use PayPal to start accepting payments via PayPal. To get started, follow the steps below.
- Enter the PayPal email of the account that will receive the payments in LiftTokens > Settings > PayPal > PayPal email.
- Go to https://www.paypal.com/businessmanage/preferences/website. Click the top right profile menu click Account Settings > Website payments > Website preferences and set the Auto return for website payments to on. Enter http://# as URL.
Information
- You can create a sanbox account to make test payments at https://www.sandbox.paypal.com. To make a payment use a sandbox account from https://developer.paypal.com/dashboard/accounts.
- The details of the PayPal user who sent the payment are visible in the details of the LiftTokens transaction.
Stripe
Use Stripe to start accepting credit or debit card payments. To get started using Stripe, follow the steps below.
- Register a Stripe account at https://dashboard.stripe.com/register.
- Activate your account at https://dashboard.stripe.com/account/onboarding.
- Visit https://dashboard.stripe.com/webhooks and add an end point, in Endpoint URL enter https://LIFTTOKENS-URL/stripe.php, replace LIFTTOKENS-URL with the URL of your LiftTokens installation, e.g. https://lifttokens.com/demo/admin. If you are using the cloud version, enter https://cloud.lifttokens.com/stripe.php. Listen for the following events: checkout.session.completed.
- Create a new product from https://dashboard.stripe.com/products and copy the Product ID, e.g. prod_MAxqp5jYGKu2Sx, paste it in LiftTokens > Settings > Stripe > Product ID. With LiftTokens, a single product is utilized for all your sales, automatically applying the appropriate sale price. The product title should be generic, such as "Crypto Payment".
- Get the secret key from https://dashboard.stripe.com/apikeys.
- Mind that the amount must be greater than 1 USD ot Stripe may not work.
- Mind that in localhost the transaction will not be marked as completed because the Stripe webhook can not be received.
Information
- Activate Stripe Tax if you are using the Stripe Tax service.
Verifone
Use Verifone (formerly 2Checkout) to start accepting credit or debit card payments. To get started using Verifone, follow the steps below.
- Register a Verifone account at https://www.2checkout.com. You can choose the plan you prefer.
- Go to https://secure.2checkout.com/cpanel/webhooks_api.php (Dashboard > Integrations > Webhooks & API) and copy Merchant Code, Secret Key, and Buy link secret word, paste the values in LiftTokens > Settings > 2Checkout.
- Go to https://secure.2checkout.com/cpanel/webhooks_api.php (Dashboard > Integrations > Webhooks & API > IPN Settings) and add a new IPN URLs, enter the URL https://LIFTTOKENS-URL/verifone.php, replace LIFTTOKENS-URL with the URL of your LiftTokens installation, e.g. https://lifttokens.com/demo/admin. In General IPN Settings select the trigger Authorized and approved orders (sent after electronic delivery) and save the changes.
- You will need to activate and verify your account before starting selling to real customers but you can use the payment details of the following page for testing purposes: https://verifone.cloud/docs/2checkout/Documentation/09Test_ordering_system/01Test_payment_methods.
- Mind that in localhost the transaction will not be marked as completed because the Verifone webhook can not be received.
Invoicing
- Invoices are not available for pending transactions.
- Invoices are deleted after 24 hours for security reasons. Administrators and users can re-generate them at a later time.
- The invoice generation link is https://LIFTTOKENS-URL/pay.php?invoice=ENCRYPTED-TRANSACTION-ID, replace LIFTTOKENS-URL with the URL of your LiftTokens installation and ENCRYPTED-TRANSACTION-ID with the encrypted transaction ID, e.g. https://lifttokens.com/pay.php?invoice=8kjY56imsLMd89oklbv4. Encrypt the transaction ID with the PHP API function lft_encryption(), the REST API function encryption, or the JS AJAX API function encryption. Add the URL attribute download to show directly the PDF.
VAT
- If you enable VAT validation you need to create an account at https://vatsense.com and enter the API key in Settings > VAT > Vatsense API key. This is a paid service but you have 100 free validations per month.
- Once checked, all VAT numbers, even the invalid ones, are saved in the LiftTokens database and excluded from any future verification.
- To deduct the VAT amount for valid VAT numbers, it is necessary to enable VAT validation.
- VAT is automatically calculated based on the user's IP address.
- VAT is only shown if the IP address is from a VAT-applying country.
- If VAT is enabled, your webhook must verify that the value is equal to or greater than the original value.
- If the invoice is enabled and the user changes the country of the invoice, the VAT country changes accordingly.
- The VAT amount is shown on the PDF invoice.
- The VAT rates are provided by https://vatstack.com and are updated periodically.
- VAT details are sent in the webhook and in the TransactionCompleted JavaScript event.
- VAT details are visible in the transaction details.
- VAT does not need to be enabled for WooCommerce and Easy Digital Download purchases because it is handled by WooCommerce and Easy Digital Download.
Custom Blockchain explorer
You can use a custom Blockchain explorer to analyze the blockchains and generate a new payment address for each transaction. To do that, follow the steps below. If you want to generate a new address for each transaction you can use https://api.blockchain.com/v3/#getdepositaddress.
Instructions
- In Settings > Custom Blockchain explorer enter the URLs to get the balance of your addresses (Balance URL), single transaction details (Transaction URL), list of the latest transactions (Transactions URL) and to activate the option that generate a new payment address for each transaction (Address generator URL). The base URLs must be the same for all cryptocurrencies, you must use the keyword {N} to automatically change the network URL part, {N} will be automatically replaced by btc, eth, doge based on the active cryptocurrency. Use {N2} to use bitcoin, ethereum, dogecoin instead. Use the keyword {R} to automatically set the address or transaction ID of the active LiftTokens transaction. For example, the URL https://blockscout.com/{N}/mainnet/api?module=account&action=balance&address={R} will become something like https://blockscout.com/btc/mainnet/api?module=account&action=balance&address=3EBVDZUU6M2Pvu4rAqHwNESDgXBfJTAz7r for Bitcoin balance and https://blockscout.com/eth/mainnet/api?module=account&action=balance&address=0x298b78d398dd02031c40a4ee42622856249aef3c for Ethereum balance.
-
In Balance path, Transaction paths, Transactions paths, Address generator path enter the JSON array paths of the values to get.
Use the following syntax:
key>subkey>..., key>subkey>..., ...
For example the Balance path of the following JSON response is result.{ "message": "OK", "result": "99639645964023592", "status": "1" } -
In Transactions paths enter the JSON array paths to get the following values:
transactions list path, transaction time in unix format, transaction address, transaction amount, number of confirmations, transaction hash.
The paths must respect this exact order.
For example, the Transaction paths value of the following JSON response is result,timeStamp,from,value,confirmations,hash.
{ "message": "OK", "result": [{ "blockHash": "0x06e8ae18e4e324d6efd438f95bfc532bab21680d852a6ac6e67021ce1227d8c5", "blockNumber": "14659898", "confirmations": "152333", "contractAddress": "", "cumulativeGasUsed": "29939474", "from": "0xeb2629a2734e272bcc07bda959863f316f4bd4cf", "gas": "21000", "gasPrice": "58000000000", "gasUsed": "21000", "hash": "0x3c437c3245999087d8e0276e73f9411f0e593ccd5ed1feacb032724a8980a606", "input": "0x", "isError": "0", "nonce": "5461738", "timeStamp": "1650972559", "to": "0xcc1486157c47c4b76fe097fdd48c3cedb20d01b6", "transactionIndex": "466", "txreceipt_status": "1", "value": "1000000000000000" }, { "blockHash": "0x0788ae1854e424d6efd438f95456ab21680d852a6ac6781ce12536d32", "blockNumber": "14659899", "confirmations": "152350", "contractAddress": "", "cumulativeGasUsed": "28939460", "from": "0xeb2629a2734e272bcc07bda959863f316f4bd4cf", "gas": "21000", "gasPrice": "58000000000", "gasUsed": "21000", "hash": "0x3c437c3245999087d8e0276e73f9411f0e593ccd5ed1feacb032724a8980a606", "input": "0x", "isError": "0", "nonce": "5461738", "timeStamp": "1650972559", "to": "0xcc1486157c47c4b76fe097fdd48c3cedb20d01b6", "transactionIndex": "468", "txreceipt_status": "1", "value": "3000000000000000" }], "status": "1" } -
In Transaction paths enter the JSON array paths to get the following values:
transaction time in unix format, transaction address, transaction amount, number of confirmations, transaction hash.
The paths must respect this exact order.
For example, the Transaction paths value of the following JSON response is result>timeStamp, result>from, result>value, result>confirmations, result>hash.
{ "message": "OK", "result": { "blockNumber": "14651093", "confirmations": "161012", "from": "0xccaad84ddf373751cceb9c2b5485810381d66972", "gasLimit": "260775", "gasPrice": "45791434002", "gasUsed": "190855", "hash": "0x24d6d2dd3992bfea4d0cedad5197a6c8fd291d87b138dba6d31b4ff28d59ac09", "next_page_params": null, "revertReason": "", "success": true, "timeStamp": "1650852706", "to": "0x7f268357a8c2552623316e2562d90e642bb538e5", "value": "173000000000000000" }, "status": "1" } - Set the setting Settings > Custom Blockchain explorer > Unit type to Satoshi | Wei | Dogecoin if the transactions value/amount is in Satoshi, Wei, Dogecoin. In the examples above the values are in Wei.
-
You can use blockscout.com to test this feature, here the details:
Unit type Satoshi | Wei | Dogecoin
Balance URL https://blockscout.com/{N}/mainnet/api?module=account&action=balance&address={R}
Balance path result
Transaction URL https://blockscout.com/{N}/mainnet/api?module=transaction&action=gettxinfo&txhash={R}
Transaction paths result>timeStamp,result>from,result>value,result>confirmations,result>hash
Transactions URL https://blockscout.com/{N}/mainnet/api?module=account&action=txlist&address={R}
Transactions paths result,timeStamp,from,value,confirmations,hash
Requirements
- All requests are made through the HTTP GET method. The custom explorer must support queries via HTTP GET method.
- The custom explorer must return data in JSON format.
Information
- We do not provide support for setting up your custom explorer. To get assistance, you can hire us.
- If the custom explorer is down or a query fails the default explores are autoamtiacally used insted.
- If the generation of a new payment address fails the default address is used instead.
- If the custom explorer does not support a cryptocurrency you can still use it, the default explorers will be used for the unsupported cryptocurrencies.
Refunds
Issue a refund from the Transactions area by clicking Issue a refund from the transaction menu.
- Enable refunds from Settings > Coinbase > Refunds, Settings > Bitcoin node > Refunds, or Settings > Ethereum node > Refunds.
- Coinbase refunds are supported by almost all cryptocurrencies, Bitcoin Node refunds only support Bitcoin refunds, Ethereum node refunds support refunds for Ethereum and all Ethereum-based cryptocurrencies.
- A cryptocurrency refund is a new transaction sent to the sender address of the original transaction and with the same amount as the original transaction. For this reason, you must have a sufficient balance of the transaction's cryptocurrency to cover the transaction amount.
- For security reasons, the address to send the refund to and the refund amount are obtained directly from the blockchain and verified with the transaction in the LiftTokens database. If the amounts or addresses do not match, an error will be displayed and the refund will not be sent.
- You can only issue refunds for completed or underpaid transactions.
- Refunds via nodes have priority over Coinbase.
Testnets
Testnets allow you to test LiftTokens and the exchange add-on without using real money. See the information below to undersatnd how to use them. When using testnet nodes you have to disable the node Address generation option.
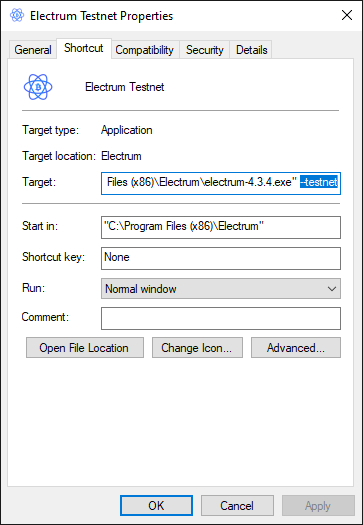
Bitcoin Testnet
| Wallet | Use Electrum in testnet mode. To enable Electrum test mode in Windows, complete the installation and create a shortcut for electrum.exe. Open the shortcut properties window, then open the Shortcut tab and add at the end of the target string the value --testnet. |
| Getting Testnet Bitcoin | |
| Node |
Ethereum Sepolia
| Wallet | Use MetaMask. To enable the Ethereum Sepolia network click the top right network label and then click Add network, select the Sepolia network. |
| Getting Sepolia ETH | |
| Node |
Email Notifications
Configure the email notifications from Settings > Email notifications.
Information
- You can update the logo on the emails at Settings > Logo > Logo URL - PNG. Additionally, make sure to enable Settings > Logo > Display on the admin area.
- The logo in user emails will have no link attached to it, whereas the logo in admin email notifications will redirect to the LiftTokens admin area.
Problems?
Emails may not be delivered several reasons; below are the most common ones:
| Reason | Description | Solution |
|---|---|---|
| Hosting problems | The email server of your web hosting provider is not able to send emails or the emails are sent but they are automatically detected as spam and deleted by the email clients. | If the settings at Settings > Notifications > SMTP are not set, your server will send the emails instead. Contact your web hosting provider regarding email support or use your SMTP server by activating it in Settings > Notifications > SMTP. |
| SMTP problems | The email is not sent also if you activated the SMTP option in the Notifications area. | If you don't receive the emails make sure they are working by sending a test email from Settings > Notifications > Send a user email notifcation or Send an agent email notifcation. If you don't receive the test email, your SMTP server, is not working. Open the browser console for more details about the error. Because this is not an issue related to Support Board , the support doesn't cover it, please contact your server/hosting/SMTP support instead. You can use sendgrid.com, you can send 40000 emails for 30 days for free, then 100/day forever for free. |
| Google Gmail | The email is not sent also if you activated the SMTP option in the Notifications area and you are trying to the Gmail SMTP server. | If you're using Gmail enter smtp.gmail.com as host and set 465 or 587 as port. You need also to allow access to Gmail to less secure apps, you can do it from https://myaccount.google.com/lesssecureapps. |
URL rewrite
You can enable the URL rewrite from Settings > URL rewrite. The default URLs of LiftTokens are not user-friendly and they include parameters. You can rewrite the URLs via .htaccess file. The code below rewrites the URLs of the checkout and invoice pages. The checkout URL changes from pay.php?checkout_id=ID to /checkout/ID. The invoice URL changes from pay.php?invoice=ID to /invoice/ID. The direct payment URL changes from pay.php?id=ID to /id/ID.
<IfModule mod_rewrite.c>
  RewriteEngine On
  RewriteRule ^checkout/(.*)$/?$ pay.php?checkout_id=$1 [L,QSA]
  RewriteRule ^invoice/(.*)$/?$ pay.php?invoice=$1 [L,QSA]
  RewriteRule ^id/(.*)$/?$ pay.php?id=$1 [L,QSA]
</IfModule>
The values to insert in Settings > URL rewrite are checkout/ and invoice/.
Information
- We do not offer support for URL rewrite as it is not related to our product. To get assistance, you can hire us.
- The values of Settings > URL rewrite must always end with /.
- If you are using the cloud version this setting is not available.
Custom fields
Include additional custom fields in the checkout form from Settings > Checkout custom fields.
Information
- You can view the custom field values under the notes section in the transaction details.
- In the webhook and JS event, the custom field values are part of the notes value.
- The select field type should have a value format of field_name:option1:option2:option3. Replace field_name with the actual name of the field and option1, option2, and option3 with the select options, add as many options as you want.
Information
- Pending transactions older than 48 hours are deleted automatically. You can change the interval from Settings > Exchange rates refresh interval. Once a pending transaction is deleted, the receiving address linked to it will be available again.
- To disable a cryptocrrency from the payment options remove the cryptocrrency address.
- Multiple checkouts can be present in the same web page but only one will be active at same time.
- LiftTokens query the blockchain via AJAX every 5 seconds to verify the payment of pending transactions.
- To test a completed transction multiple times without a real payment add the following attributes to the checkout URL: ?demo=true&amount=[123]&id=[ID]&webhook_key=[key]. Replace [123] with the exact transaction cryptocurrency amount, [ID] with the LiftTokens transaction ID, [key] with the LiftTokens webhook secret key, this attribute is optional. The blockchain transaction time must be higher than the LiftTokens transaction time. If you are using the WordPress version, you have to set the webhook secret key.
- Add the debug=true attribute to the payment URL or admin URL to enable debugging in the browser console and PHP log.
Agents
You can create agents account to allow other people to access the LiftTokens admin area with limited privileges. Agents are not allowed to perform the following actions:
- View and save the settings.
- Create, save, and delete checkouts.
IP ban
LiftTokens permits a maximum of 10 unsuccessful login attempts within an hour. If you exceeds this limit, you will be barred from accessing the admin area for a duration of 1 hour. This blocking mechanism is based on the user's IP address and serves to deter brute force attacks aimed at uncovering login credentials. If you encounter the "Too many login attempts. Please retry again in a few hours." error, you have two options: either wait for a few hours or make changes to the LiftTokens database by deleting the ip-ban row from the lft_settings table.
Two-factor authentication
To add an extra layer of security, activate Google Authenticator and enable two-factor authentication (2FA) for logging into the admin area. To do this, follow the instructions below:
- Activate Settings > Two-factor authentication.
- Click Pairing button and scan the QR code with the Google Authenticator app.
- Enter the code generated by the Google Authenticator app in the Code field and click Validation.
Monero
- The Monero balance currently is not shown in the LiftTokens dashboard. We will try to add the support soon.
- The Monero payments are detected only if the transaction is within the last 5 block. If the transaction is older than 5 blocks it will not be detected. For this reason, the user should wait for the transaction to be confirmed before closing the payment page.